
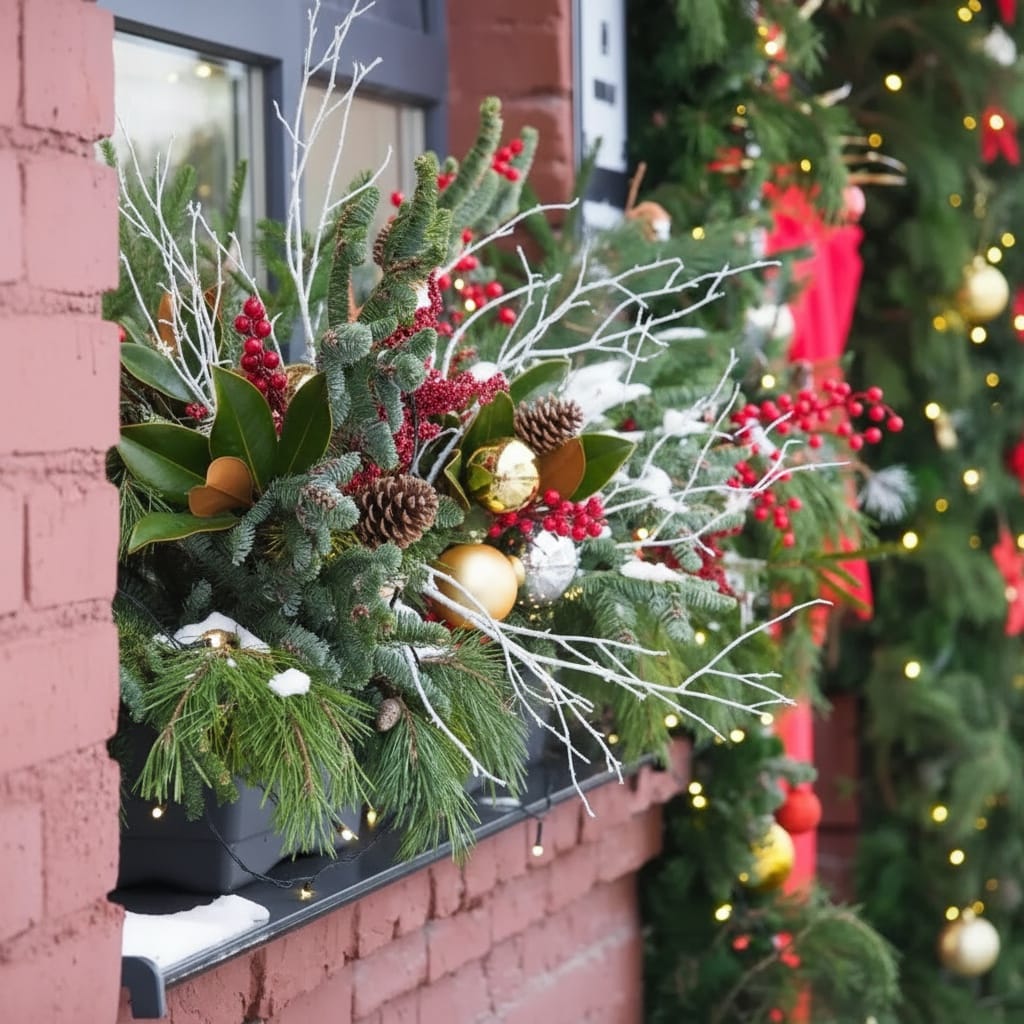
Most winter container advice online was written for places where the ground never freezes solid. Follow it in Michigan and you get a container of dead plants by January, or a cracked pot in March.
The approach that works here is different, simpler, and much more forgiving. Once you understand why, everything else in this guide follows from it.
THE SHORT ANSWER: CUT MATERIAL, NOT LIVING PLANTS
A winter porch pot in Michigan should be built from cut evergreen boughs, cut branches, berries and cones. Not from living, rooted plants.
A rooted plant in a container has no protection. In a garden bed the surrounding soil holds warmth and buffers the swings. In a pot on a porch, cold air reaches the root ball from every side and the whole mass freezes and thaws all winter. A shrub rated hardy for Michigan in the ground can still die in a pot on the same property, and usually does.
A cut bough has already been separated from its roots, so freezing costs it nothing. There is no living tissue left to damage.
WHY ROOTLESS GREENS ARE THE RIGHT ANSWER HERE
What actually finishes cut greens is not cold. It is moisture loss. Needles and leaves keep releasing water into the air after the bough is cut, and once they have lost enough they brown and drop.
Cold slows that down considerably. Dry winter air speeds it up, but the trade runs strongly in your favor here. The same fir bough that drops needles in a heated room in a few weeks holds color outdoors for months.
THE EVERGREENS WORTH KNOWING
A good winter container mixes three or four kinds of green rather than one, each doing a different job.
| Green | What it does in the pot |
|---|---|
| Fraser fir | The structure. Stiff branches that hold their angle, dark green with a silvery underside, and excellent needle retention. |
| Cedar | The drape. Soft, flat sprays that spill over the rim and hide it, filling volume for very little money. |
| White pine | The softener. Long, fine, blue-green needles that fill gaps and keep a dense arrangement from looking stiff. |
| Boxwood | The contrast. Small, tight, bright green leaves on short stems. Reads formal and tidy against needled greens. |
| Juniper and balsam | Accents. Juniper brings a blue cast and small blue berries. Balsam brings the fragrance. |
STEMS, BERRIES AND THE ACCENT LAYER
Greens alone give you a green mound. Height and color are what make the container read from the street.
- Birch stems. White bark against dark evergreen is the highest contrast available in a winter pot, and the vertical line does more for the silhouette than anything else.
- Red twig dogwood. The other classic vertical. Bare stems in bright red, at their most saturated in the cold months. Yellow twig varieties do the same job in a different key.
- Magnolia leaves. Large, glossy and two-toned: deep green on the face, warm bronze on the reverse. Turn them either way, and they hold their shape as they dry.
- Winterberry. A native deciduous holly whose bare stems carry dense red berries, and the best source of real color in a winter pot. Birds eventually find them, which is a fair trade.
- Pinecones. Texture and weight at the base and in the gaps, usually wired onto picks so they can be set at an angle rather than dropped in.
- Faux berries, picks and ribbon. No shame in these. They hold color all winter with no drop, and mixed among real material they are indistinguishable from the sidewalk.
WATER, FREEZE AND THAW, AND WHICH POTS CRACK
The single most useful trick in winter containers is also the simplest. Install while the soil in the pot is still workable, push the stems in deep, then water the container once. The soil freezes around the stems and locks the entire arrangement in place until spring. Wind stops being a problem.
After that one watering, a winter pot needs nothing. Cut material has no roots, so there is nothing to water. This is the most common misunderstanding about winter containers, and it works in your favor.
The container itself is where Michigan winters do real damage. Water gets into a porous pot wall, freezes, expands, and does it again on every thaw. That cycle cracks pots, not the cold on its own.
- Leave outside: fiberglass, resin, metal, and concrete rated for freeze-thaw.
- Empty and store: terracotta, unglazed clay, and glazed ceramic. These are the pots that show up cracked in March.
- Either way: keep the drainage holes clear and do not let a container sit in standing water or a solid sheet of ice. Trapped water is what turns a survivable winter into a broken pot.
LIGHTING
Michigan winter afternoons go dark early, so an unlit display is invisible for most of the hours anyone is home to see it. Lighting is the highest-return addition to a winter container.
Battery-powered LED sets with built-in timers need no outlet and can go anywhere on the porch. The trade is maintenance: cold drains batteries faster, so expect to change them more often in deep winter. Plug-in outdoor-rated lights on a timer are the set-and-forget option where an outlet is within reach.
Either way, wrap the vertical stems rather than burying strands in the greens. Light running up a birch stem gives the arrangement depth after dark. Light sunk into a bough glows as a shapeless patch.
BUILDING ONE YOURSELF, IN ORDER
If you are making your own, the sequence matters more than the shopping list. Work from the inside out.
- Deal with the depth first. Greens only need enough soil to grip the cut end of a stem, so a deep container does not need to be full of soil. Leaving last season's soil in place is the easiest answer. If the pot is very deep, take up the extra volume at the bottom with an upended nursery pot, a block of rigid foam, or bagged filler, then top with enough soil to set stems into.
- Set the verticals. Birch or dogwood stems go in first, at the center or the back depending on whether the pot is seen from all sides.
- Build the structure. Fraser fir next, angled outward and downward from the center, working around the pot so the outline stays even.
- Add the drape. Cedar and white pine at the rim, spilling over the edge so no soil and no pot lip is visible.
- Place accents in threes. Magnolia, winterberry and cones, grouped rather than scattered evenly.
- Water once, and let it freeze. That is the last step of the install and the whole maintenance plan.
COMMON QUESTIONS ABOUT WINTER PORCH POTS
What do you put in the bottom of a winter porch pot?
Whatever takes up volume cheaply, because cut greens need only enough depth to hold a stem upright. Last season's soil left in place is the simplest filler. In a deep container, an upended nursery pot, rigid foam, or bagged filler at the bottom with soil on top works and saves you carrying a pot full of frozen dirt. Do not block the drainage holes.
Do winter porch pots need water?
One watering, at install, and then nothing. The purpose of that watering is not to feed anything. It is to freeze the soil around the stems so the arrangement cannot be pulled apart by wind. Cut material has no roots, so watering it afterward does nothing.
How long do winter porch pots last in Michigan?
An arrangement installed before Thanksgiving generally holds through the winter. Cold is a preservative here, so the limiting factor is dry air, wind and sun rather than temperature. A sheltered, shaded entry keeps its color longest. A south-facing pot in full sun and wind fades first.
Can I use live plants in a winter container in Michigan?
It can be done with very hardy evergreens in a large, insulated container, but it becomes a horticultural project rather than a decoration, and container roots still get no protection. For a display meant to look good from November through winter, cut material is more reliable and less expensive.
Where can I get winter porch pots near me in Metro Detroit?
We design and install winter containers across Oakland County and the wider metro area. See our service area for the communities we cover, and seasonal decor for how a one-time install works. Timing is the thing worth planning: read when to swap fall planters for holiday greenery before you pick a date.